
Write a browser test: steps, targets and checks
A test is a start address and a list of steps. Each step is one thing a person does on the page, or one thing that should then be true. This page goes through the editor: the steps, how a step finds its element, the checks, and how to try a test before you save it.
Open the editor with New test on the Tests page, or Edit on a test. The steps fill the page; Settings, Alerts and Variables are in the panel on the right. On a phone they are one column, with Run and Save at the bottom of the screen.
Name, folder and labels
Click Untitled test at the top to name the test. Below the name, pick a folder (or No folder) and add labels, the same labels your tasks use. When the folder sets something for its tests, such as a schedule or an environment, a line under it says what.
Where the test starts
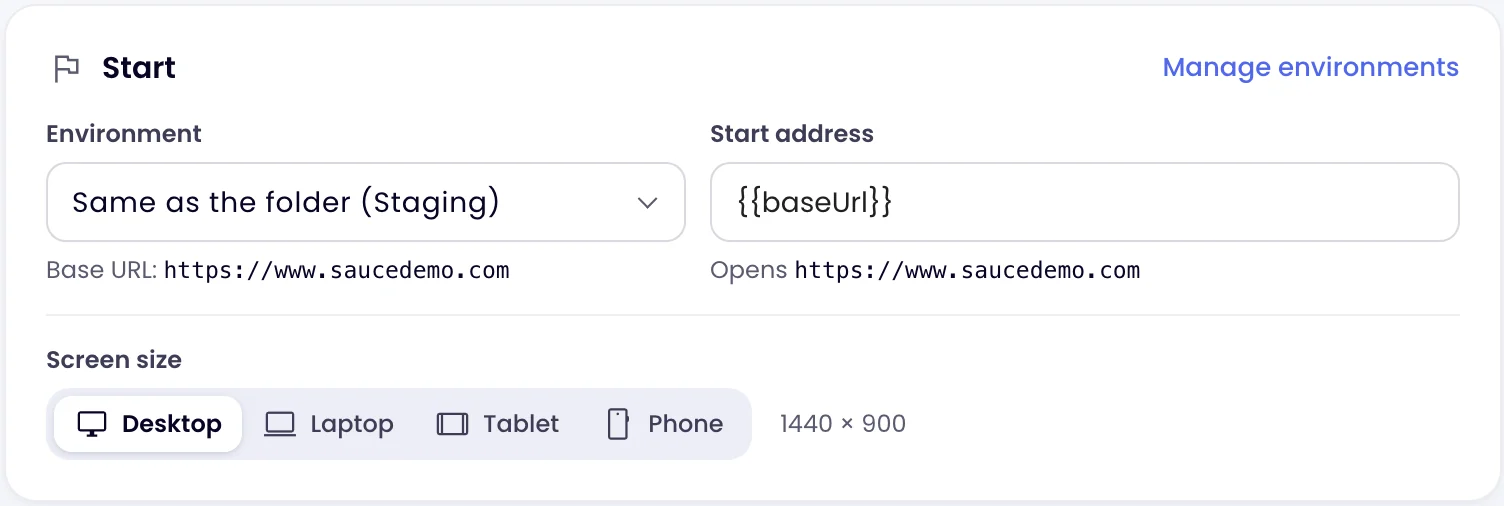
- Environment: which environment the test runs on. It gives the test a base URL and variables, so the same test can run on staging and live.
- Start address: the first page the test opens. A full address (
https://shop.example.com/login), a path (/login) that is added to the environment’s base URL, or{{baseUrl}}/login. The line below shows the address it will open. - Screen size: Desktop (1440 × 900), Laptop (1280 × 800), Tablet (768 × 1024) or Phone (390 × 844). Pick Phone to test your mobile layout.
Add and arrange steps
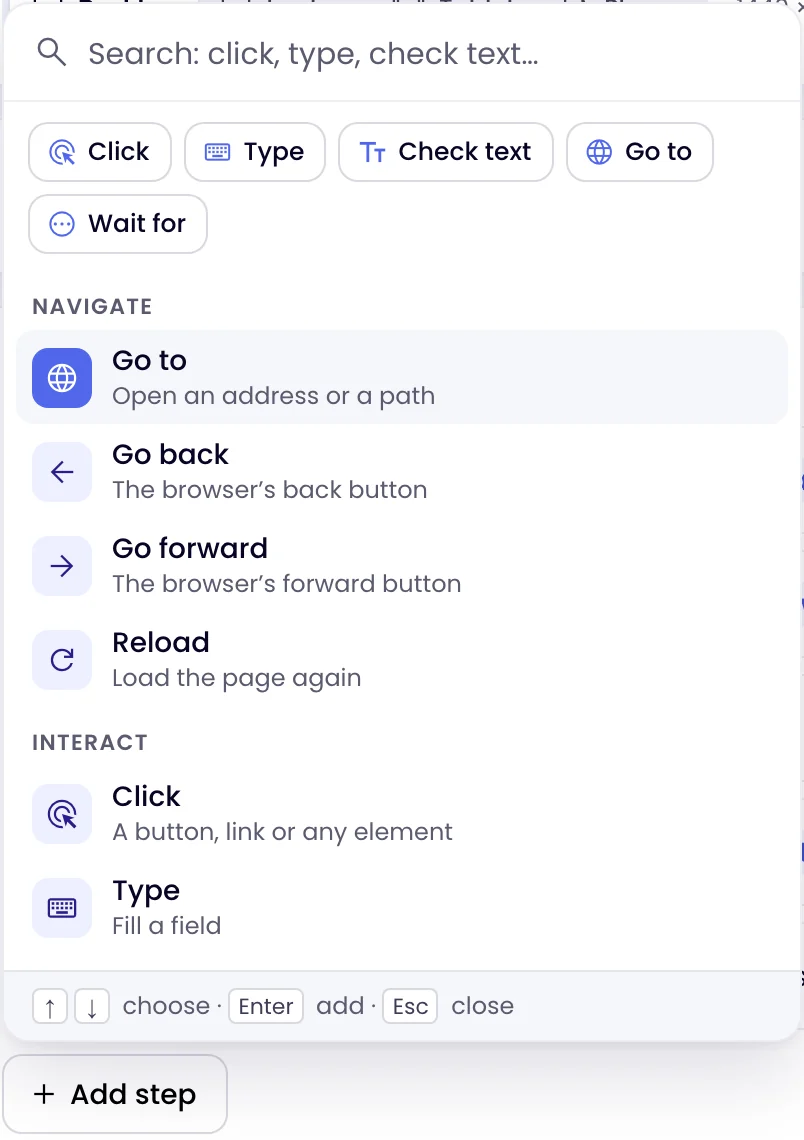
- Click Add step under the list, or, on a new test, one of the common first steps. A menu opens with shortcuts to the most used steps and every step type by group. Type to search it, pick one with the arrow keys and press Enter.
- The new step opens. Fill in its fields; the step’s sentence at the top of its row updates as you type, for example “Click button “Login””.
- Click a step’s row to open or close it. Drag a row by its handle to move it, or use Alt + ↑ ↓.
- The ⋮ menu on a row has Duplicate, Disable (the step is skipped until you enable it), Run up to here, Insert step above, Insert step below, Move up, Move down and Delete.
A test has up to 100 steps.
Step types
The Add step menu groups the steps the way they are listed here.
Navigate
| Step | What it does |
|---|---|
| Go to | Opens an address or a path, and waits for the page to load. |
| Go back, Go forward | The browser’s back and forward buttons. |
| Reload | Loads the page again. |
Interact
| Step | What it does |
|---|---|
| Click | A button, link or any element. Choose Click, Double-click or Right-click. |
| Type | Fills a field. Switches: Secret, Clear the field first (on by default) and Press Enter after. |
| Choose an option | Picks from a dropdown, by the option’s text as it shows or by its value. |
| Tick, Untick | A checkbox. Tick works for radio buttons and switches too. |
| Press a key | Enter, Escape, Tab or a combination such as Control+A, optionally In a particular element. |
| Hover | Moves the pointer over an element, for menus and tooltips that open on hover. |
| Scroll | To an element, To the bottom, To the top or By pixels (a negative number scrolls up). |
Wait
| Step | What it does |
|---|---|
| Wait | A fixed number of seconds, up to 60. |
| Wait for | An element to be visible, hidden, added to or removed from the page; An address that contains some text or matches a pattern; or A quiet network. |
Check
| Step | What it does |
|---|---|
| Text | The whole page or An element contains, is exactly, does not contain, is not, or matches the pattern of some text. |
| Element is visible | An element is visible, hidden, on the page even if hidden, or not on the page. |
| Address | The page’s address, for example contains /thank-you. |
| Page title | The title in the browser tab. |
| Number of elements | Exactly, at least, at most, more than or fewer than a number of matches: rows, results, cards. |
| Field value | What a field contains. |
| Attribute | An attribute such as href, aria-expanded or disabled. |
| Page has no errors | No Errors in the browser console and no Failed requests to the same site since the last page load. Tick one or both. |
| Check with AI | Describe what should be true; Monity AI judges it from a screenshot of the page. It uses 1 more credit each run. |
Data and code
| Step | What it does |
|---|---|
| Save a value | Keeps an element’s text, a field’s value or an attribute as a variable for later steps, optionally only the part a regular expression keeps. |
| Set a variable | A value later steps use as {{name}}. |
| Run JavaScript | Runs code in the page, like the browser’s console. With Fail the step when it returns false it becomes a check. |
Tell a step which element to use
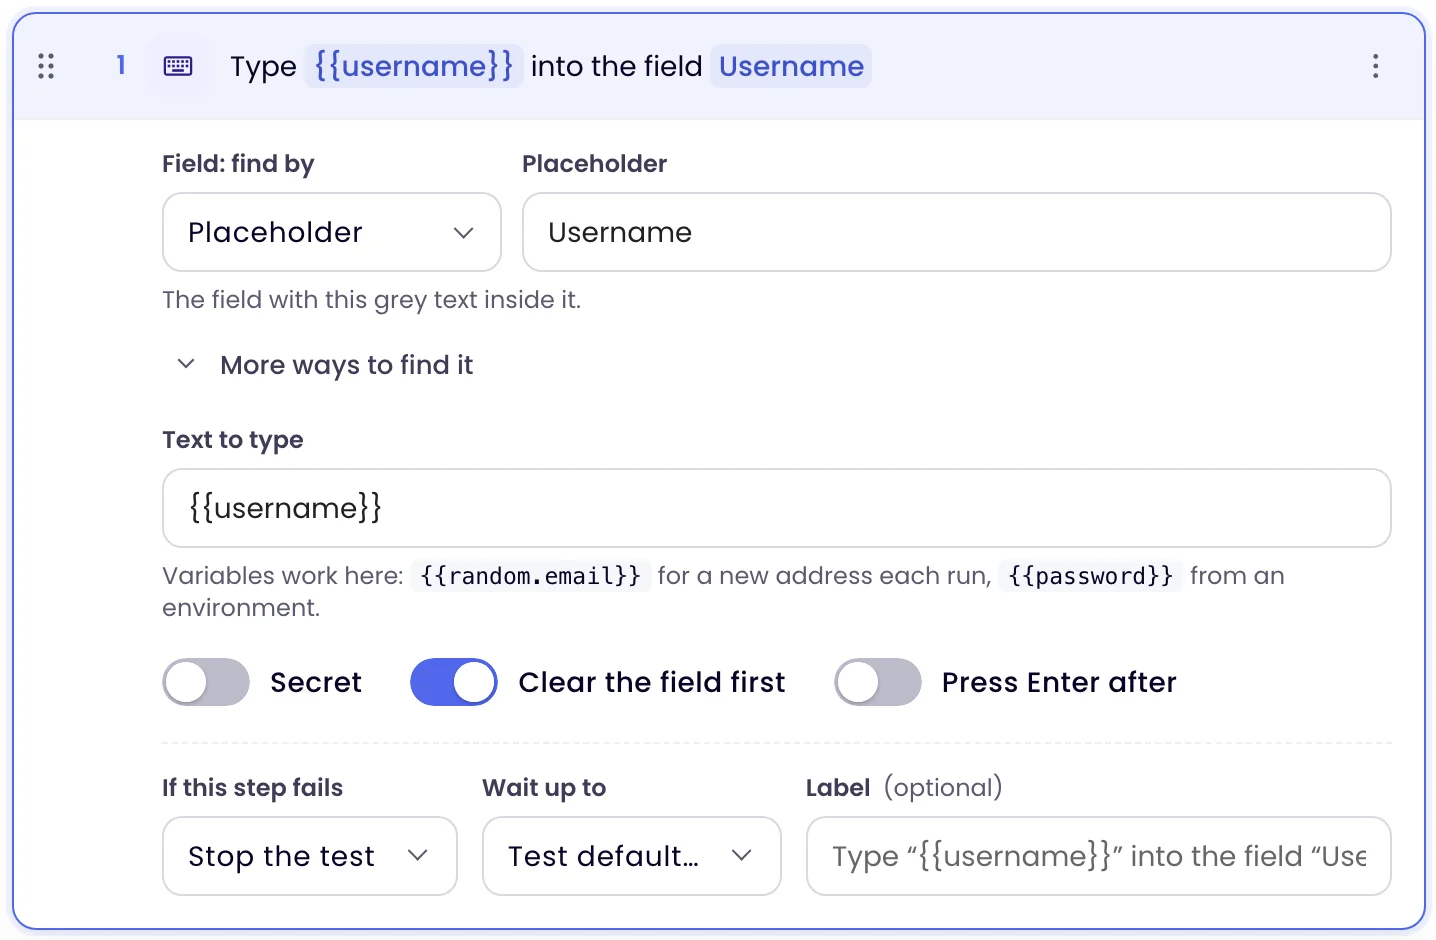
Steps that act on an element have a find by menu and a value. Pick the way a person would describe the element; those survive a redesign best.
| Find by | Matches | Example |
|---|---|---|
| Role and name | The kind of element (Button, Link, Text field, Checkbox, Heading…) and the name a screen reader reads: a button’s text, a field’s label. The most reliable choice. | Button “Log in” |
| Label | The form field whose label reads this. | |
| Text | The element that shows this text. | Pricing |
| Placeholder | The field with this grey text inside it. | you@example.com |
| Test id | The element whose data-testid, data-test, data-test-id, data-cy or data-qa attribute is this value. Good when your developers add test ids. |
add-to-cart |
| CSS | A CSS selector. It breaks when the page’s markup changes. | #signup, .btn-primary |
| XPath | An XPath expression, starting with / or (. |
//button[@type="submit"] |
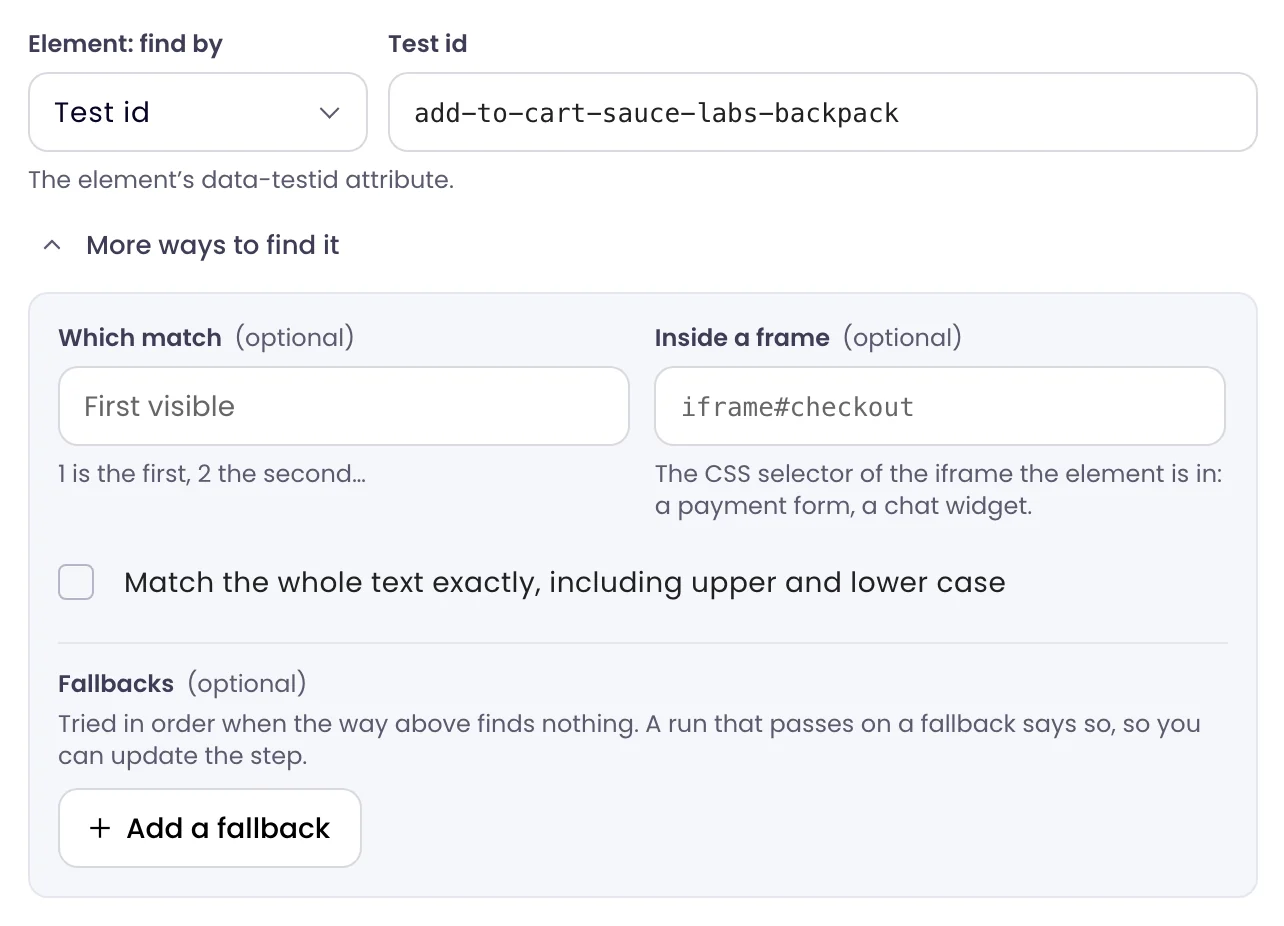
Matching ignores upper and lower case and finds the text inside longer text, so “log in” matches a button reading “Log in now”. Open More ways to find it for the rest:
- Which match: when several elements match, 1 is the first, 2 the second. Left empty, the step uses the first visible one, as a person would.
- Inside a frame: the CSS selector of the iframe the element is in, such as a payment form or a chat widget.
- Match the whole text exactly, including upper and lower case.
- Fallbacks: other ways to find the same element, tried in order when the main one finds nothing. A run that passes on a fallback says so, so you can update the step.
Checks wait for the page
Every step waits for its element to appear and be ready, and every check keeps checking until it is true, up to the step’s time limit (10 seconds unless you change it). So you rarely need a Wait step: “Check the page contains “Thank you for your order!”” passes as soon as the message appears, and fails only if it has not appeared after 10 seconds.
Two settings at the bottom of an open step change how it behaves:
- If this step fails: Stop the test (the run fails and the steps after it are skipped), Continue, the test fails (the steps after it still run), or Only warn (the run can still pass, with a warning, and sends no alert). Use Only warn for something you want to know about but that should not wake anyone up, such as a cookie banner.
- Wait up to: this step’s own time limit, from 1 to 60 seconds, instead of the test’s.
An optional Label replaces the step’s generated sentence in results and alerts.
Variables
Write {{name}} in any value or element field and the run puts the variable’s value there. Variables come from, in this order: values saved earlier in the run (Save a value, Set a variable), the test’s own Variables in the right-hand panel, the environment‘s variables, and the built-in ones:
| Variable | Value |
|---|---|
{{baseUrl}} |
The environment’s base URL. |
{{random.email}} |
A new address each run, such as test+k3x9q2ma@example.com, for sign-up forms. |
{{random.string}} |
10 random lowercase letters and digits. |
{{random.number}} |
A random six-digit number. |
{{uuid}} |
A random UUID. |
{{timestamp}}, {{date}} |
The time in milliseconds, and the date as YYYY-MM-DD (UTC). |
{{totp.NAME}} |
The current two-factor code for the secret in the variable NAME. See Environments and secrets. |
A generated value is made once per run, so a later step can check for the same {{random.email}} it typed. For two different ones, add any suffix: {{random.email.buyer}} and {{random.email.seller}}.
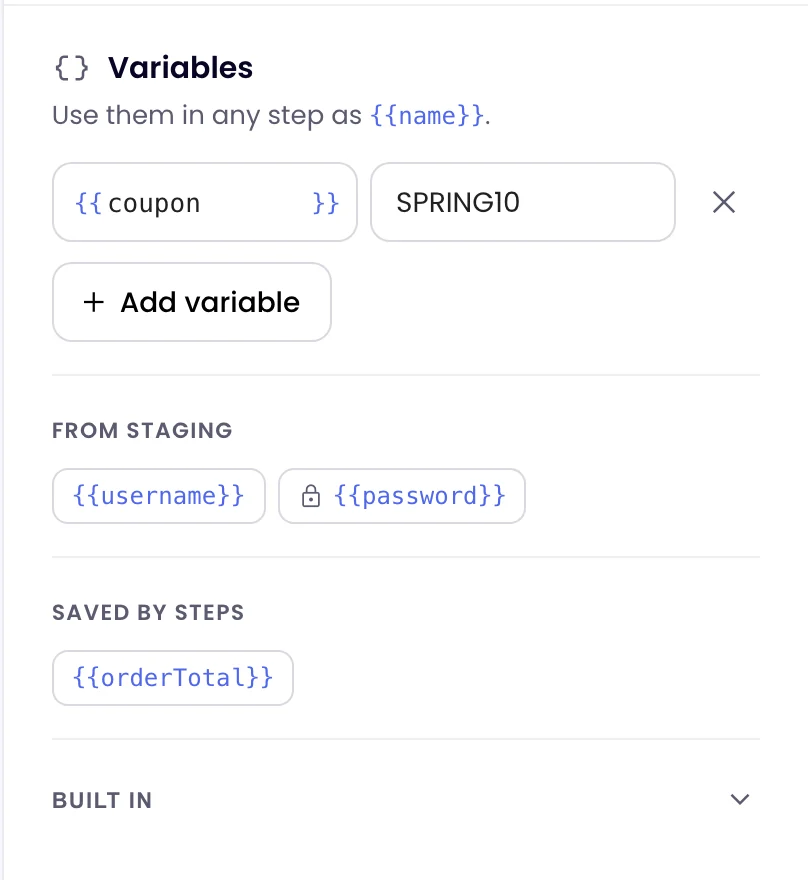
Turn on Secret on a Type step and its value is shown as •••• in results, logs, screenshots and alerts. A password typed into the step is stored encrypted and never shown again; to use one password in many tests, keep it as a secret in an environment and type {{password}}: a step that types an environment’s secret is treated as secret on its own.
Try it before you save
Click Run at the top (or press ⌘ Enter, Ctrl Enter on Windows). It runs what is on screen, saved or not. The panel on the right ticks off each step as it runs, with its time, and for a step that fails, what was expected and what was found. Each row in the step list gets the same result, and Open full run shows every step’s screenshot. Run up to here in a step’s ⋮ menu runs the test only as far as that step, handy while you build a long journey.
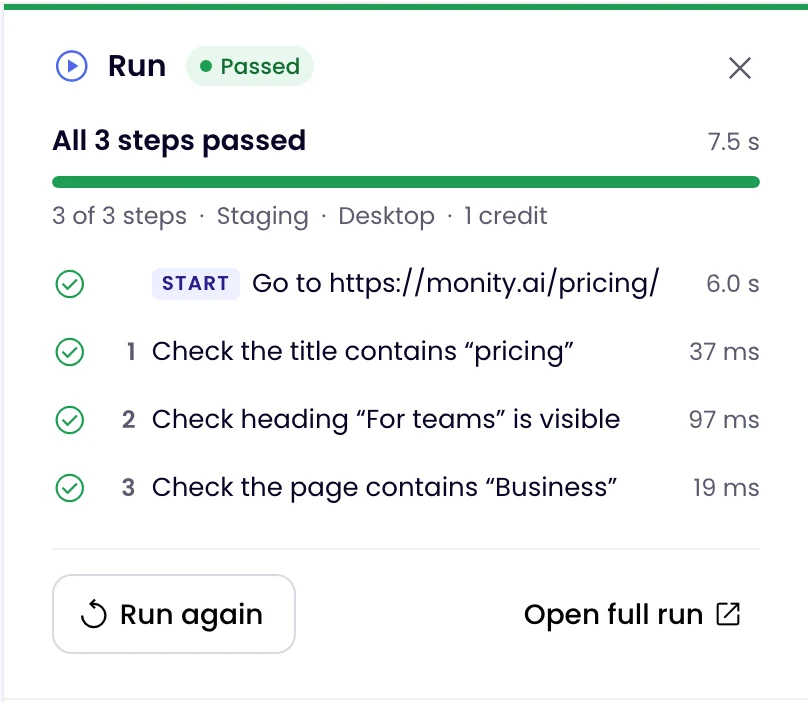
Runs from the editor use credits like any run, but they do not change the test’s status and never alert. When you are happy, click Create test (or Save, ⌘ S).
Settings
| Setting | Choices |
|---|---|
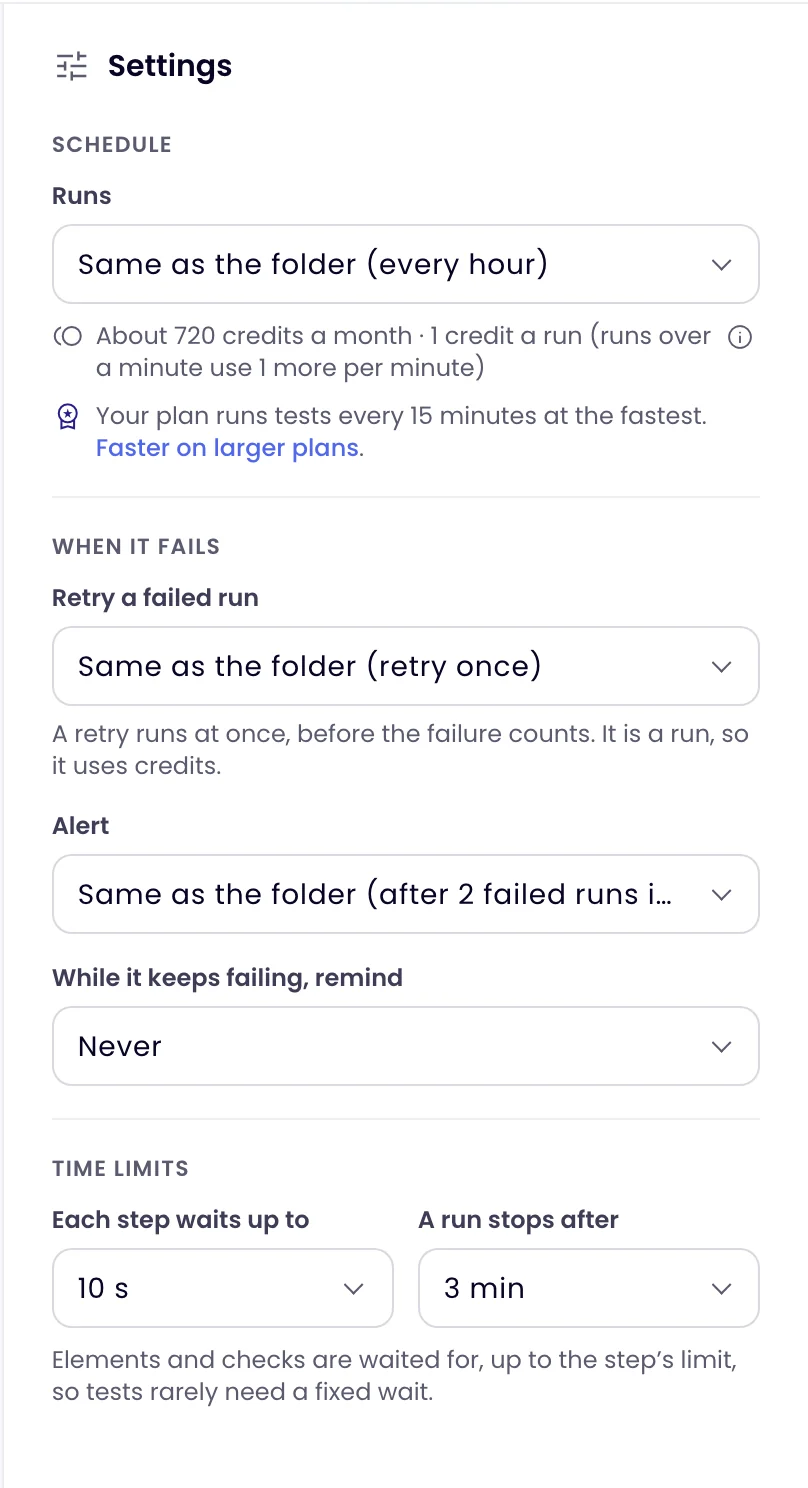
| Runs | Manual, or after a deploy, or every 5, 10, 15 or 30 minutes, every hour, every 3, 6 or 12 hours, or every day. Each choice shows about how many credits a month it uses; faster than your plan allows shows a lock. Every hour by default. |
| Retry a failed run | Do not retry, Retry once (default) or Retry twice. A retry runs at once, before the failure counts, and uses credits. |
| Alert | After the first failed run (default), or after 2, 3, 4, 5 or 10 failed runs in a row. |
| While it keeps failing, remind | Never (default), Every hour, Every 4 hours or Every day. |
| Each step waits up to | 1 to 60 seconds; 10 by default. |
| A run stops after | 30 seconds to 8 minutes; 3 minutes by default. |
In a folder, a setting the folder decides shows Same as the folder with the folder’s choice; pick another value to override it for this test. Alerts below the settings chooses the channels, as on a task.